Category: MySql

  • Understanding One-to-One Relationships: Database vs Java (Hibernate)

    Understanding One-to-One Relationships: Database vs Java (Hibernate)

    When modeling One-to-One relationships, you can approach it in several ways depending on the ownership, lifecycle, and data modeling constraints. While Java and Hibernate offer flexibility in how this relationship is implemented at the code level, the root of it lies in database design. So let’s start there.


    One-to-One Relationship Strategies in Database Engineering

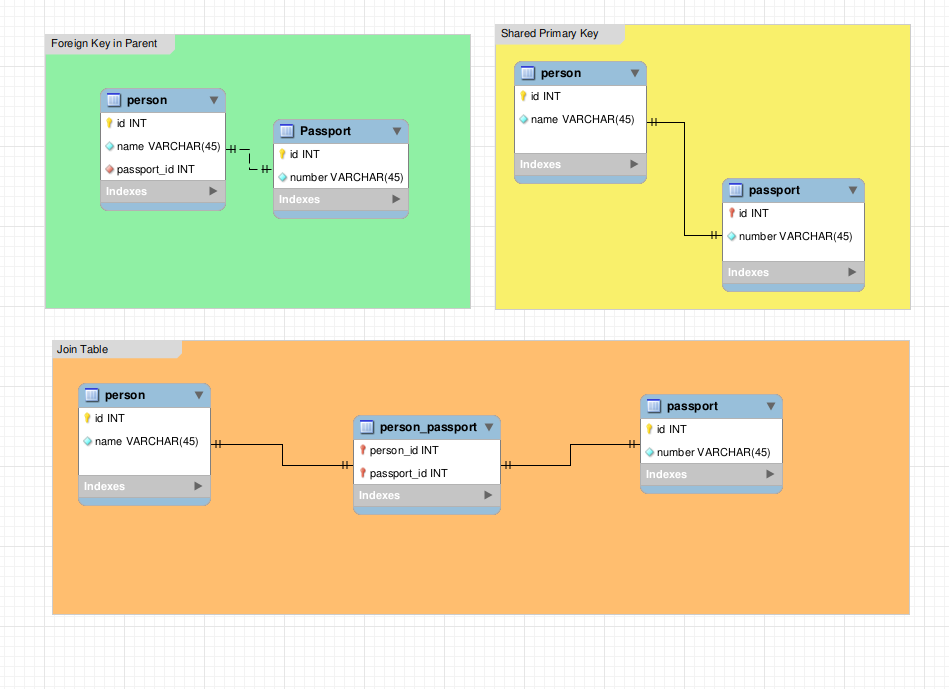
    In relational databases, a One-to-One relationship means each row in Table A corresponds to exactly one row in Table B, and vice versa. But there are multiple ways to implement this, depending on the direction and ownership of the relationship.

    1. Foreign Key in Parent Table (Shared Primary Key strategy – reversed)

    • How it works: The parent table (e.g., Person) holds a foreign key to the child table (Passport.id).
    • Pros:
      • Easy to query from parent.
      • Clear ownership.
    • Cons:
      • Implies that the parent cannot exist without the child — or needs NULL values.
      • Foreign key can be NULL if optional.
    CREATE TABLE person (
        id BIGINT PRIMARY KEY,
        name VARCHAR(100),
        passport_id BIGINT UNIQUE,
        FOREIGN KEY (passport_id) REFERENCES passport(id)
    );
    

    2. Child Table Uses Parent’s Primary Key (Shared Primary Key strategy)

    • How it works: The child table (e.g., Passport) uses the same ID as the parent (Person) — usually both primary key and foreign key.
    • Pros:
      • Enforces strict 1:1 relationship.
      • Cleaner data integrity — Passport cannot exist without Person.
    • Cons:
      • Less flexible if the child becomes optional.
      • Harder to manage outside ORMs.
    CREATE TABLE person (
        id BIGINT PRIMARY KEY,
        name VARCHAR(100)
    );
    
    CREATE TABLE passport (
        id BIGINT PRIMARY KEY,
        number VARCHAR(50),
        FOREIGN KEY (id) REFERENCES person(id)
    );
    

    3. Join Table Strategy (Less common for One-to-One)

    • How it works: A third table (e.g., person_passport) holds person_id and passport_id with a unique constraint.
    • Pros:
      • Very flexible and decoupled.
      • If the relation has a tendency to become 1xN or Nx1 or NxN then it’s a good choice because it will make the transition easier.
    • Cons:
      • Overkill unless mapping polymorphic or cross-entity relations.
      • High complexity for something that can be simple.

    Entity Mapping in Hibernate & Java

    Now let’s translate this to Java and Hibernate.

    Shared Primary Key Strategy (Child uses parent’s ID)

    @Entity
    public class Person {
        @Id
        private Long id;
    
        @OneToOne(mappedBy = "person", cascade = CascadeType.ALL)
        private Passport passport;
    }
    
    @Entity
    public class Passport {
        @Id
        private Long id;
    
        @OneToOne
        @MapsId
        @JoinColumn(name = "id")
        private Person person;
    
        private String number;
    }
    
    • @MapsId indicates that Passport shares the same primary key as Person.
    • Very tight coupling — used when lifecycle is tightly bound.

    Foreign Key in Parent Table

    @Entity
    public class Person {
        @Id
        private Long id;
    
        @OneToOne
        @JoinColumn(name = "passport_id")
        private Passport passport;
    }
    
    @Entity
    public class Passport {
        @Id
        private Long id;
        private String number;
    }
    
    • More flexible: Person can exist without Passport.
    • You control fetch/lazy, cascade, optionality more easily.
    • More flexible: Person can exist without Passport.
    • You control fetch/lazy, cascade, optionality more easily.

    What about property with JoinTables?

    Sometimes, your model may evolve and you’d rather keep the base entity clean and extend when needed. For example, instead of putting a Passport inside Person, you could have:

    @Entity
    public class Passport  {
    
        @OneToOne
        @JoinTable(
            name = "person_passport",
            joinColumns = @JoinColumn(name = "person_id"),
            inverseJoinColumns = @JoinColumn(name = "passport_id")
        )
        private Passport passport;
    }
    

    This approach uses:

    • Join Table in JPA.
    • @JoinTable allows modeling more flexible or optional relationships.
    • Useful when only some persons have passport.
    • A smart choice when there’s a possibility that the relationship’s cardinality may change.

    It’s especially powerful when you want to modularize behavior and avoid cluttering the base Person class but makes the entity mapping very complex.


    What About Inheritance with Joined Strategy?

    Sometimes you just want a easier way to navigate the entity properties and treat the two tables as a single entity. For example, instead of putting a Passport inside Person, you could extend it:

    @Entity
    @Inheritance(strategy = InheritanceType.JOINED)
    public class Person {
        @Column
        @Id @GeneratedValue(strategy = GenerationType.IDENTITY)
        private Long id;
    }
    
    @Entity
    public class Passport extends Person {
    
       @Column
       private String number;
    }
    

    Summary

    • InheritanceType.JOINED allows you to split the data into separate tables for each class in the inheritance hierarchy.
    • The child class has its own table and its joined with the parent class, so the child entity has all properties from the parent as its own.
    • Hibernate will automatically handle the joins when querying entities from the inheritance hierarchy.

    This strategy is useful when you want to follow database normalization principles but be mindful of the performance overhead due to the necessary joins when querying data.


    Final Thoughts: Choosing the Right Strategy

    Your choice of strategy in the database layer directly impacts your entity mapping in Java:

    • Use Shared Primary Keys when the two entities are tightly bound and always created/removed together.
    • Use a Foreign Key in Parent when the child is optional or loosely coupled.
    • Use Join Tables or Inheritance when dealing with complex relationships, partial behaviors, or domain subtypes.

    Choosing the right one-to-one mapping isn’t just about the ORM — it’s about data consistency, flexibility, and how your domain actually behaves.

  • 🛠️ Step-by-Step: Install Caddy + WordPress on Ubuntu EC2

    🛠️ Step-by-Step: Install Caddy + WordPress on Ubuntu EC2

    ✅ 0. Prerequisites


    ✅ 1. Update System

    sudo apt update && sudo apt upgrade -y

    ✅ 2. Install PHP + Dependencies

    WordPress needs PHP and extensions:

    sudo apt install php php-mysql php-curl php-gd php-mbstring php-xml php-xmlrpc php-zip php-soap php-intl php8.3-fpm unzip curl -y
    

    ✅ 3. Install Caddy (Official Script)

    sudo apt install -y debian-keyring debian-archive-keyring apt-transport-https
    
    curl -1sLf 'https://dl.cloudsmith.io/public/caddy/stable/gpg.key' | sudo tee /etc/apt/trusted.gpg.d/caddy-stable.asc
    
    curl -1sLf 'https://dl.cloudsmith.io/public/caddy/stable/debian.deb.txt' | sudo tee /etc/apt/sources.list.d/caddy-stable.list
    
    sudo apt update
    sudo apt install caddy -y
    

    Caddy will auto-start and be set as a systemd service.


    ✅ 4. Download and Setup WordPress

    📁 Go to web root

    cd /var/www
    sudo mkdir wordpress
    cd wordpress
    

    ⬇️ Download WordPress

    sudo curl -O https://wordpress.org/latest.zip
    sudo unzip latest.zip
    sudo mv wordpress/* .
    sudo rm -rf wordpress latest.zip
    

    🔐 Set permissions

    sudo chown -R www-data:www-data /var/www/wordpresssudo chmod -R 755 /var/www/wordpress
    

    ✅ 5. Create a database

    # admin or your rds mysql user
    sudo mysql -h your-rds-endpoint.amazonaws.com -u admin -p

    CREATE DATABASE wordpress;

    CREATE USER 'wp_user'@'%' IDENTIFIED BY 'strong_password';

    GRANT ALL PRIVILEGES ON 'wordpress'.* TO 'wp_user'@'localhost';

    FLUSH PRIVILEGES;

    EXIT


    ✅ 6. Configure Caddy

    📄 Edit the Caddyfile

    sudo nano /etc/caddy/Caddyfile
    

    Example config:

    yourdomain.com {
        root * /var/www/wordpress    
        file_server    php_fastcgi localhost:9000
    }
    

    Replace yourdomain.com with your domain or public IP (e.g., ec2-3-85-123-45.compute-1.amazonaws.com)

    If you have a domain, you must point it to the EC2 public address in the DNS config of your provider.

    If you’re not using a domain yet, Caddy won’t get HTTPS — use plain HTTP by setting:

    :80 {
        root * /var/www/wordpress    file_server    php_fastcgi localhost:9000    
    }
    

    ✅ 7. Restart Services

    sudo systemctl reload caddy
    sudo systemctl restart php8.3-fpm
    

    ✅ 8. Open Ports in Security Group

    In the EC2 Security Group:

    • Allow HTTP (80)
    • Allow HTTPS (443) (if using domain + SSL)

    ✅ 9. Access WordPress

    Now go to:

    http://your-ec2-public-ip

    or

    https://yourdomain.com

    You’ll see the WordPress setup screen!

    Just finish the configuration process answering the requested information!

    And Voalá! You have your personal WordPress up and running! 🎉

  • Use Amazon RDS (Managed MySQL Database)

    Use Amazon RDS (Managed MySQL Database)

    Free service

    AWS RDS (Relational Database Service) lets you run MySQL with automatic backups, security, and updates — no server setup needed.

    Pre-requisite: UC2 Server


    ✅ Steps to Create a MySQL Database on Amazon RDS

    1. Go to RDS

    • In AWS Console, search for RDS and click it

    2. Click “Create database”

    3. Choose:

    • Database creation method: Standard Create
    • Engine options: Select MySQL
    • Version: Choose latest (8.x is good)

    4. Settings

    • DB instance identifier: e.g., mydb
    • Master username: admin (or your choice)
    • Master password: Create a strong password

    5. Instance size

    • Select Free tier: db.t3.micro

    6. Storage

    • Keep default (20 GiB is fine for now)

    7. Connectivity

    • VPC: Default
    • Public access: Yes (so you can connect from outside)
    • VPC security group: Create new or select one that allows port 3306 (MySQL)

    8. Additional configuration

    • Database name: e.g., mydatabase
    • Keep defaults for rest (you can adjust later)

    9. Click “Create database”

    Wait a few minutes for the DB to launch.


    ✅ 10. Connect to Your MySQL DB

    Once it’s ready:

    1. Go to Databases > your-db-name
    2. Copy the Endpoint and Port
    3. Connect using a MySQL client:

    From EC2 terminal:

    sudo apt update
    sudo apt install mysql-client -y
    
    mysql -h your-endpoint.rds.amazonaws.com -P 3306 -u admin -p

    Enter your password when prompted.